AnimaShooter Pioneer
-
 AnimaShooter Pioneer is a user-friendly stop-motion animation software. Works with any webcam. Supported resolution is up to 3840x2400 (WQUXGA). Easy to learn, easy to use.
 -

-
 AnimaShooter dispose d'un ensemble de fonctionnalités stop-motion que vous pouvez utiliser gratuitement et pour toujours : charger et sauvegarder des projets, prendre des images avec une webcam ou des dispositifs de connexion HDMI, éditer et exporter vos séquences, tous les filtres y compris la prévisualisation chromakey, importer de la vidéo, etc... c'est-à-dire la plupart des fonctionnalités, même de nombreuses fonctions essentielles de stop-motion sont pour toujours gratuitement utilisables.
Installation du programme
- 1. Exécutez le programme d'installation. Vous verrez le premier écran de bienvenue. Cliquez sur le bouton Suivant.
- 2. Dans la fenêtre Contrat de licence, cochez la case J'accepte les termes du contrat et cliquez sur Plus loin.
- 3. Si nécessaire, modifiez l'emplacement de l'installation et appuyez sur Plus loin. Attendez que l'installation soit terminée.
- 4. Sur l'écran d'installation finale, assurez-vous que la case Démarrer le programme après avoir terminé l'installation est cochée.
- Sélectionnez Applimage->Clic droit-Propriétés--Autorisations-Autoriser l’exécution du fichier en tant que programme
- Ou utilisez la ligne de commande :$ chmod a+x AnimaShooter*.AppImage$ ./AnimaShooter*.AppImage
Windows 10, 11
Linux
Activation
- L'activation nécessite une connexion internet active.
-
 Appuyez sur le bouton d'activation. Le dialogue d'activation apparaît.
 -
 Entrez votre code d'activation et cliquez sur Activer.
 -
 Nous vous recommandons d'utiliser les opérations de copier-coller (CTRL + c et CTRL + v) pour saisir le code d'activation.
 -
 Cliquez sur le bouton Evaluer maintenant pour activer immédiatement le logiciel.
 -
 Remarque : la période d'évaluation ne peut pas être prolongée. Lorsque la période d'évaluation est terminée, vous devez acheter un code d'activation pour continuer à utiliser le produit.
Si vous avez déjà un code d'activation (Activation Code)
Evaluation
De-Activation
- Pour déplacer une licence d'un appareil à un autre, veuillez effectuer une désactivation. La désactivation nécessite une connexion Internet active.
-
 Cliquez sur le bouton d'activation. La boîte de dialogue d'activation apparaît.
 - Passez à l'onglet De-Activation et cliquez sur le bouton De-Activer la licence (De-Activate the License).
- Attention, vous ne pouvez pas désactiver votre licence lorsque vous êtes dans une période d'évaluation.
Web Camera Quick Setup
-
 Plug-in web camera to the computer with a USB cable.
 -
 Give AnimaShooter a second or two to discover it.
 -
 Once your camera name displayed press Connect button.
 -
 Create a new or open existing project.
 -
 Make a shot by clicking Capture button.
Create a Project
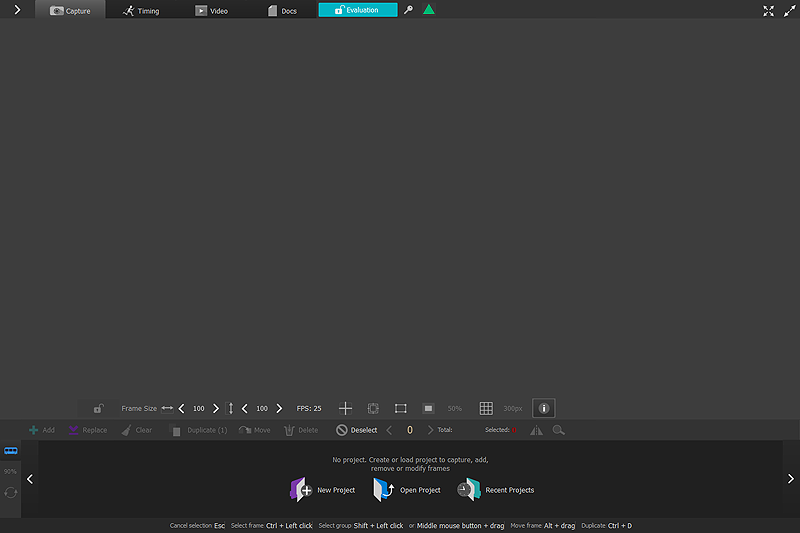
- To capture frames or create a video in AnimaShooter, you first create a project.
-
 To create a project click this button. In the window that appears, type a name for the project in the Name field and click Save.
 -
 You can change a project's properties at any time. To customize settings for your project, click this button.
 - You can copy or move your project to another computer to continue editing the project or to make a backup.
- AnimaShooter project consists of a project file and a project folder which name corresponds to project file name. For example, if you named your project "MyMovie", the corresponding project folder has MyMovie_files name. AnimaShooter project can contain frames, settings, temporary images, cache, etc.
- To copy your project to another computer you must copy both items: project file and a project folder. Copy the project file and a project folder as you normally do.
- To move a project to another computer or storage rather than copying it, follow the instructions for copying a project, then delete the project from the original computer.
Create a new project
Modify a project's settings
Copy a project to another device
Capture
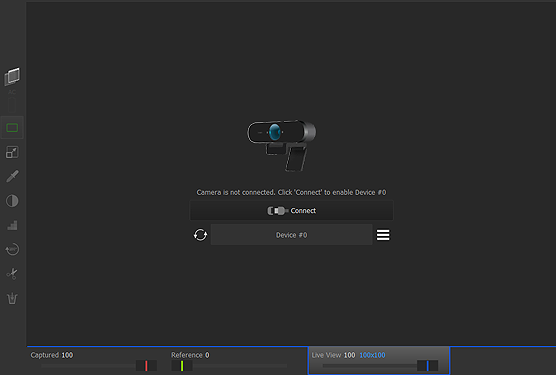
- Click Capture button to make a shot.
-
 You can capture multiple frames at once. Before the capture button locate the drop down panel. Click button with number of frames you want to capture by one press. Switch betwen Add and Replace modes to add or replace frames.
 -
 Switch to Prefix tab to set up the prefix to be prepended to each captured frame.
 -
 Use Time Lapse feature to automatically capture images at predefined intervals.
Capture multiple frames at once
Prefix
Auto Capture (Time Lapse)
Chemins
- Vous pouvez ajouter au projet un nombre quelconque de lignes vectorielles (Paths) qui peuvent être utilisées comme guides ou trajectoires de mouvement.
-
 Le panneau Paths vous permet de contrôler le calque des chemins, les chemins eux-mêmes et leurs points. Vous pouvez contrôler l'affichage des chemins, leur couleur ainsi que la transparence de l'ensemble du calque Chemins. De même, vous pouvez contrôler la visibilité des points, leur alignement ; effectuer des actions d'annulation et de rétablissement des points ; supprimer un point ou tous les points. Le panneau Paths est disponible à la fois depuis l'onglet Capture et depuis l'onglet Timing.
 -
 Cliquez sur ce bouton pour accéder au panneau Couches.
 -
 Cliquez sur ce bouton pour masquer ou afficher la couche Paths.
 -
 Appuyez sur ce bouton pour commencer à dessiner des trajectoires à la main.
 -
 Cliquez sur ce bouton pour ajouter des points de ligne.
 -
 Cliquez sur ce bouton et dessinez un rectangle pour ajouter une polyline.
 -
 Vous pouvez contrôler la géométrie de la ligne en faisant glisser ses points et en changeant leur type. Placez le curseur de la souris sur un point et utilisez Maj + clic pour changer le type de point de ligne à courbe ou vice versa.
 -
 Vous pouvez déplacer, mettre à l'échelle, supprimer des parcours individuels, des points, des ensembles de points ou tous les parcours du projet. Pour sélectionner un chemin, cliquez dessus avec la touche Ctrl ou double-cliquez sur un point appartenant à ce chemin.
 -
 Pour supprimer un point ou plusieurs points, sélectionnez-les et appuyez sur la touche Retour arrière, ou sur le bouton Suppression.
 -
 Pour supprimer toutes les trajectoires, cliquez sur ce bouton. Le contour du bouton devient jaune. Confirmez la suppression en cliquant à nouveau sur ce bouton. Cliquez sur le bouton avec le bouton droit de la souris ou appuyez sur la touche Echap pour annuler la suppression.
 - Notez que vous ne pouvez actuellement pas annuler la suppression des parcours d'outils et de leurs points d'ancrage.
Ajout d'un chemin
Contrôle des chemins
Contrôle de l'exposition pour les images RAW
- Applicable uniquement aux images RAW. Vous devez prendre des images RAW pour pouvoir régler l'exposition.
-
 Vous pouvez contrôler l'exposition de vos images à tout moment : pendant le tournage ou plus tard, lorsque vous testez votre séquence ou que vous préparez l'exportation.
 -
 Activer et définir Préserver les hautes lumières pour préserver les hautes lumières lors de l'éclaircissement de l'image (0,0 - aucune préservation, 1,0 - préservation complète).
 -
 Activez et réglez la Compensation numérique de l'exposition pour configurer le décalage de l'exposition. Plus cette valeur est élevée, plus l'image est claire.
 -
 Activez Utiliser la BDB de l'appareil photo pour appliquer les paramètres de balance des blancs de l'appareil photo pendant le traitement RAW.
 -
 Activez l'option Crop Image pour recadrer l'image RAW si elle est plus grande qu'elle ne devrait. De nombreux appareils photo capables de prendre des clichés RAW ont une sorte de fonction : ils peuvent capturer et enregistrer des images RAW qui sont légèrement plus grandes qu'elles ne devraient l'être selon les paramètres de l'appareil. Recadrez l'indésirable avec la fonction Crop Image activée.
 - Notez que le traitement des données RAW peut prendre du temps. Veuillez être patient.
Modes peau d'oignon et mélange
- Vous pouvez utiliser la fonction de peau d'oignon pour mélanger l'image de la caméra avec l'image actuellement capturée.
-
 Utilisez le curseur de transparence de couche pour décider de la quantité de transparence des images actuelles et précédentes. Vous pouvez mélanger les paramètres de la peau d'oignon, la transparence du calque et les modes de mélange.
 -
 Définissez le mode de fusion pour déterminer la manière dont les couches Capturé, Référence et Live View sont mélangées les unes aux autres, en fonction des conditions d'éclairage et des couleurs de votre scène.
 - Dans ce mode, seules les différences entre une caméra et l'image capturée sont visibles. Utile lorsque la caméra ou le poste a été accidentellement heurté et que vous devez aligner une prise de vue.
Onionskin
Modes de fusion (modes de fusion SVG 1.2)
Mode différentiel
Multiscreen
-
 AnimaShooter Pioneer can utilize multiple monitors at once, one of which can operate as a lightbox.
 -
 Click this button to open a separate window to preview captured and reference images.
 -
 Click this button to open a lightbox window.
Timeline
-
 You can hide any frame using the Hide button. Hidden frames are normal frames except they not played nor exported.
 -
 Use Ctrl + Click to select one or more frames.
 -
 Using the middle mouse button, you can select single frame or a group of frames.
 -
 To move one or a group of frames, use the Alt + drag.
 -
 Pour copier une ou plusieurs images, utilisez les touches Ctrl + Alt + glisser.
 -
 You can also use the regular Ctrl + C and Ctrl + V to copy and paste frames.
Hide any frame
Select frames in arbitrary order
Select a sequence of frames
Move frames
Copy frames
Importer des images
- Vous pouvez ajouter des images à la ligne de temps dans les formats suivants : FIF.APPEND(FIF.TOUPPER())
-
 Cliquez sur Ajouter->Cadres pour ajouter une ou plusieurs images. Cliquez sur Ajouter->Séquence pour ajouter une séquence d'images numérotées. AnimaShooter va créer un nouveau cadre pour chaque image à importer. Le premier nouveau cadre sera ajouté juste après le cadre actuel.
 -
 Cliquez sur Remplacer->Cadres pour remplacer une ou plusieurs images. Cliquez sur Replace->Séquence pour remplacer les images sur votre timeline avec une séquence d'images numérotées spécifiées par un masque de nom de fichier. AnimaShooter remplacera la quantité spécifiée d'images en commençant par l'image actuelle.
 - Vous pouvez importer des fichiers d'images brutes CRW ou CR2 dans votre projet exactement de la même manière que vous importez n'importe quelle autre image.
- Notez que lors de l'importation, AnimaShooter convertit les images RAW et enregistre chaque image importée au format JPG avec une qualité de 100%.
Add Images
Remplacer les images
Import RAW Images
RAM Preview
-
 Le mode RAM Preview vous permet de visualiser rapidement l'animation que vous avez prise sans créer de fichier vidéo. Vous pouvez ajuster manuellement la taille de l'aperçu ou l'ouvrir à tout l'espace disponible. Pour voir comment fonctionne cette fonction, allez dans l'onglet Timing et appuyez sur le bouton Lecture ou la barre d'espace.
 -
 La ligne jaune en bas de la Timeline marque la gamme d'images à jouer via la RAM Preview.
 -
 To play back a project switch to Timing tab.
 - Play a whole project from the beginning: Locate the RAM-Preview control panel. Click Range -> All. Press the Space bar or click the Play button.
- Play a section of a project: Drag left and right markers to the desired positions. When you select a portion of the project, the selected area is marked with a yellow line. Press the Space bar or click the Play button.
- Stop playback: Press the Space bar or click the Stop button.
Gamme
Play back a project
Aperçu et contexte de Chromakey
- Chromakey Preview est un effet utile avec RAM-preview pour tester rapidement votre jeu si vous utilisez l'arrière-plan de couleur pour une incrustation ultérieure.
- Le chromakey ou chroma keying (également appelé écran vert) est un effet visuel et une technique de post-production permettant de composer (superposer) deux images ensemble en se basant sur la séparation de l'arrière-plan du sujet d'une image supérieure.
- Vous pouvez choisir n'importe quelle couleur comme arrière-plan chromatique pour votre scène, mais la seule chose à laquelle vous devez faire attention est que la couleur d'arrière-plan ne doit être présente sur aucune partie du sujet de premier plan. En général, les meilleurs résultats sont obtenus avec un arrière-plan vert.
-
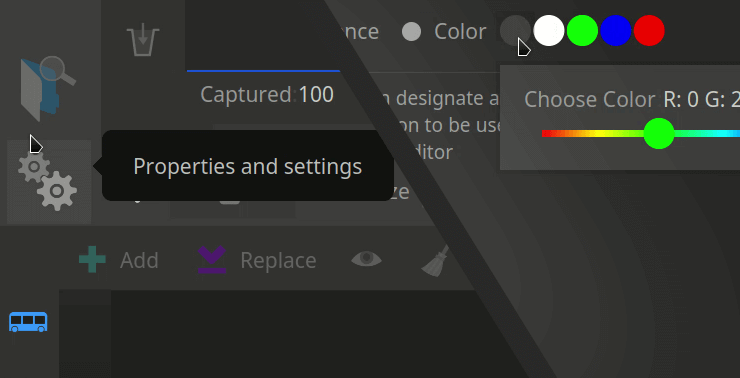
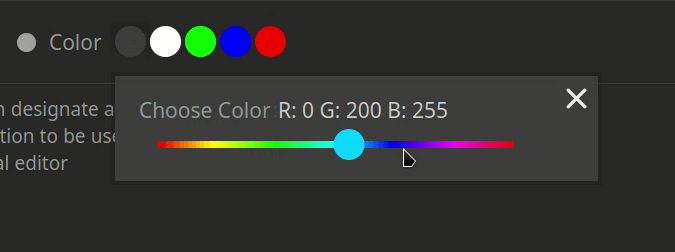
 Dans AnimaShooter, le chroma key est implémenté comme un effet à appliquer aux images. Il prend une gamme de couleurs sélectionnée et l'élimine de l'image, révélant une image de fond. Allez dans l'onglet Filtres pour le configurer.
 -
- Choisissez une couleur avec La pipette et cliquez sur le bouton Appliquer.
- Paramétrez la valeur Similarité pour la couleur clé. Plus cette valeur est élevée, plus les couleurs similaires seront éliminées.
- Définissez Blend pour rendre les pixels transparents en fonction de leur similarité avec la couleur clé.
- Remarque, l'effet chromakey est nommé "Chromakey Preview" car il est conçu pour produire rapidement un effet brut. Il est destiné à être utilisé en prévisualisation, et non en production.
-
 You can add a custom background to appear behind the chroma key image. The background is a regular image of any format AnimaShooter can handle.
 -
 Click this button to choose a background image.
 - Click this button to remove a background image.
Effet de prévisualisation Chromakey pour RAM-preview et export
Définir la couleur de la chromakey
Background
Export Frames
-
 AnimaShooter Pioneer can export captured frames in form of sequence of JPG, PNG, TIFF, WEBP, BMP images. You can export all of the frames or specified range of frames.
 - Range Tool is the yellow line on the bottom of Timeline, which marks the range of frames to be exported.
Range Tool
Exporter la vidéo
- AnimaShooter Pioneer can create video from a sequence of captured frames. Note that frame dimensions (width and height) must be a multiple of 8. Press Encode Video button to start encoding.
- The yellow line on the bottom of the Timeline marks the range of frames to be exported.
- To play the video with an embedded player your system must have video codecs installed. If embedded video-player does not play video, most likely your system does not have the appropriate codecs.
-
 You can always check the total length of your video in hours and seconds with the time counter, located on the Timing tab. Plus, you can move the cursor over the Timeline to see the frames-to-time conversion for every part of your sequence.
Range Tool
Effets vidéo
-
 You can apply various effects when exporting video. Each effect is applied to the entire exported sequence of frames. Currently, you can apply only one effect at once. Video effects allow you to sharpen, smooth out the grain in your images, average your frames with lightness, adjust color, colorize frames, etc.
 - Use the Antiflicker effect to reduce flicker.
- What is flicker? It's the common problem of inconsistent lighting or luminance variation between consecutive pictures taken on the same camera, with the same lens and settings.
- Use the Spatial Smoothing effect to remove grain while preserving edges.
- Use the Sharpen effect to compensate unfocus or blurring artifacts.
Notice these effects to improve your animation:
Extract Video Frames
-
 You can import video into your project by means of turning its frames into a sequence of still images. The audio track will not be imported.
 -
 Determine where and how you want to add frames. You can add frames right after the current one, or replace frames starting from the current one. You can add frames to the Captured row as well as to the Reference row.
 -
 Click this button to open the Import dialog box. You can import any video playable by the AnimaShooter built-in video player.
 - Instead of extracting all frames, you can select a range within a video. You can adjust the range selection start and end points by clicking on Start Point and End Point buttons.
-
 If there are selected frames on the timeline, the video import will replace them, starting from the first selected frame. In this case the End button will not be available. Only as many frames as are highlighted on the timeline will be imported.
 -
 To set the start point: Make sure video is playing or paused. Drag the playhead to the desired position and click Start Point button to set a range start point.
 -
 To set the end point: Make sure video is playing or paused. Drag the playhead to the desired position and click End Point button to set a range end point.
 - To adjust where the range starts or ends: Drag the playhead to desired position and click Start Point button to set a range start point or End Point button to set a range end point.
-
 Note, extraction should take a while.
Select a range: You can select a portion of a video called a "range"
Click this button to start extraction.
Frame Size
-
 To simplify setting up a frame size, AnimaShooter provides a mechanism retaining the aspect ratio. Any change of the frame width will change its height automatically.
 - Note, the ratio is more important than size in pixels. E.g., to get a 1080p output (1920x1080, 16:9 ratio) from the 6000x4000 (or similar) frame you can set frame size that is close to 6000x4000 but still has a 16:9 ratio. This could be 6000x3375 pix. Set your frame size to 6000x3375, shoot frames, then on export set Video Export Policy to crop frame to 6000x3375 and scale down to 1920x1080.
Fiche d’exposition (feuille X)
-
 Une feuille d'exposition (également connue sous le nom de X-sheet ou Dope Sheet) est un outil d'animation traditionnel qui permet à un animateur d'organiser et de contrôler le timing de l'animation. L'onglet timing contient le tableau de la feuille d'exposition qui montre la séquence des images capturées et leurs numéros de phase. Les cellules du tableau peuvent contenir des marqueurs rectangulaires. Le marqueur bleu indique une première image statique dans une séquence d'images statiques. Le marqueur noir indique l'une des images normales (non statiques). Vous pouvez spécifier un numéro de phase directement dans la cellule du tableau de la feuille d'exposition. Pour ajouter un numéro de phase, cliquez sur l'un des cadres non statiques ou le premier cadre statique et tapez un numéro à l'endroit où le zéro apparaît.
Uninstallation
- If you are using AnimaShooter as an AppImage, simply delete the .AppImage file.
- On the Start menu, select Settings .
- Sélectionnez l'application à désinstaller, puis sélectionnez Désinstaller.
- Suivez les instructions à l'écran.
Linux
Windows 10, 11
AnimaShooter Workflow Overview
- To capture frames or create a video in AnimaShooter, you first create a project. To create a project click this button In the window that appears, type a name for the project in the Name field and click Save. You can change a project's properties at any time. To customize settings for your project, click this button
 You can copy or move your project to another computer to continue editing the project or to make a backup.
 - Plug-in your camera to computer with USB cable. If you're using AnimaShooter Сapture: switch your camera to Manual (M) mode. Set camera quality setting to L, RAW, RAW+L. Turn camera ON and give AnimaShooter a second or two to discover it. Once your camera name displayed, press Connect button.
- Click Capture button to make a shot. Wait until the shooting process completes. You can capture multiple frames at once. Before the capture button locate the drop down panel. Click button with number of frames you want to capture by one press.
- Switch to Timing tab to check your animation with RAM-preview feature. Look at the Timeline. Yellow line at the bottom of Timeline marks the range of frames to be played. Set a range of frames to play and press Play button or spacebar to see RAM-preview in action.
- When your project is finished, you can encode a video of various formats. You can export your video files for publishing, sharing, broadcast delivery, further audio mixing, or post-production. To further polish your project, you can apply some filters to your sequence or video: adjust contrast and/or saturation, remove noise.
- The most common method of exchanging video across editing and compositing programs is a sequence of numbered images. AnimaShooter can export captured frames in the form of a sequence of JPG, PNG, TIFF, WEBP, BMP images. You can import your image sequence into an editing program of your choice (AfterEffects, Premiere Pro, etc.).
The overall process for creating a movie is described below. You don’t have to do every step, and you might do others that aren’t listed. The real workflow isn’t necessarily linear
Create a new project
Connect your camera
Capture frames
Test your sequence
Create a video
Create a sequence
Enable Live View Scopes Window
-
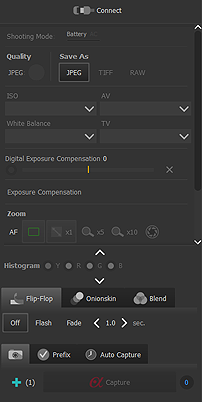
 Click this button to evoke Live View Scopes window.
 -
 The The Waveform shows the intensity of both the luminance (brightness) and chrominance (color) levels of an image, depending on the waveform you choose. Unlike the histogram, the waveform displays the levels of each pixel in its location on the image.
 -
 You can easily choose which type of waveform you’d like to see: the RGB waveform (shows the RGB signals separated); the luma waveform (displays the brightness of shots) and the chrominance (shows you all three red, green, and blue channel levels as a composite). The display brightness level in the oscilloscope can be adjusted.
 -
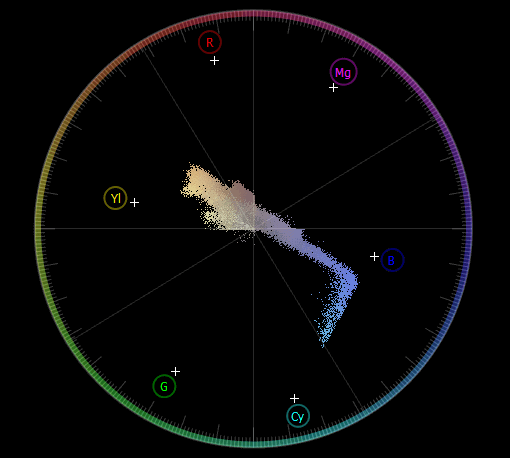 The vectorscope displays the hue and the amount of color in an image.
AnimaShooter is able to show Y Waveform, RGB Parade, and Vectorscope in real-time
Evoke Live View Scopes window
Waveform
Types of waveform and brightness level setting
Vectorscope
Import Frames
-
 Every frame has two cells: Captured image cell (1) and Reference image cell (2). Use Add and Replace buttons to control the contents of cells.
 - Use Add option to add new captured or reference frames. Use Replace option to fill an empty cell with an image (captured or reference). Use Add->Sequence or Replace->Sequence option to import sequence of numbered images.
-
 Click Create a new project or Recent projects to load an existing project.
 - Click Add button. To find it, look at the lower left corner of AnimaShooter window.
-
 You can select any amount of image files in arbitrary order. Click Open to start import.
 - Click Add button. To find it, look at the lower left corner of AnimaShooter window.
-
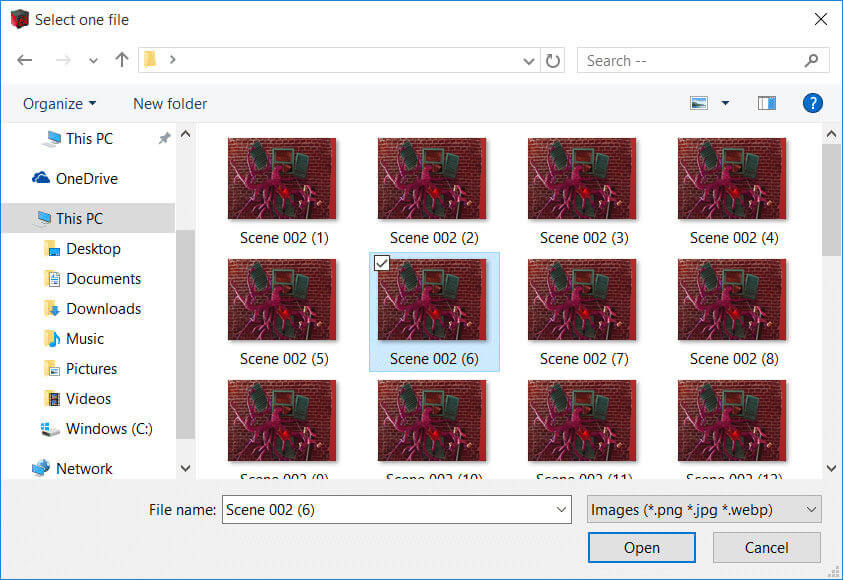 Select one file and click Open. AnimaShooter will import a sequence of numbered images, using selected file name as a mask. For example, if you choose Scene_002 (6).png file, the following files will be imported:
- Scene_002 (1).png
- Scene_002 (2).png
- Scene_002 (3).png
- ...
- Scene_002 (2930).png
Import arbitrary frames or a sequence of frames, using single file name as a mask
Structure of the frame
1. Create a new or open an existing project
A. Import a specified amount of frames
A1. Click Add button
A3. Select frames
B. Import a sequence of numbered images, using single file name as a mask
B1. Click Add button
B3. Select one frame
High Resolution Video Export
-
 Click Open project file or Recent projects and load an existing project.
 - Switch to Timing tab and look at the bottom of the Timeline. The yellow line on the bottom of the Timeline marks the range of frames to be exported.
-
 Specify video size. You can set frame size up to 8k (7640 x 4320 pixels). Note that frame dimensions (width and height) must be a multiple of 8.
 -
 Wait until the process completes.
 - Exporting high-res frames that are 4000 x 3000 or larger requires a lot of RAM. You can set frame size up to 8k (7640 x 4320 pixels) and successfully produce a video (WebM or OGV), but that file may not be playable on some computers and with some players.
- AnimaShooter is primarily for capturing stop motion animation. Though AnimaShooter is not video editing software it is quite suitable for stitching together frames. You can always use AnimaShooter to convert your frames into a video.
Make a video: WebM, OGV, AVI or uncompressed video
Open project
Switch to Timing tab
Set up video size and options
Wait
Copy a Sequence
- Open an existing project.
- Use Ctrl + Click or middle mouse button to select a range of frames to be copied.
- Hold Ctrl + Alt, press the left mouse button, and drag the orange arrow from the first frame to the last one.
How to copy a sequence of frames
Load Your Project
Select Frames to Copy
Copy Frames
Sequence Export
- Click Open project file or Recent projects and load an existing project.
- Switch to Timing tab and look at the bottom of the Timeline. The yellow line on the bottom of the Timeline marks the range of frames to be exported.
-
 Click this button if you wish to export all of the frames. You can always adjust the range manually.
 - Click Sequence tab to set up image format and export options. Choose an export format (PNG, JPG, TIFF, WebP, BMP).
- If the current frame size doesn't match the actual size of the captured image, you need to set up the export policy. AnimaShooter can stretch the image to fit the frame size or crop image.
- Click this icon to select the output folder. Then click Start Export button to begin export. Wait until the export process completes.
-
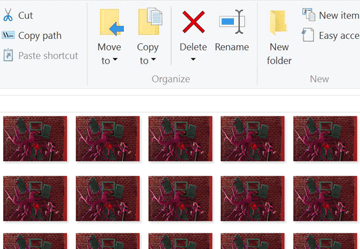
 Click View Exported Frames button.
 -
 The most common method of exchanging video across editing and compositing programs is a sequence of numbered images. You can import your image sequence to an editing program of your choice (AfterEffects, Premiere Pro, etc.).
Export your frames as a sequence of JPG, PNG, TIFF or WEBP images
Open project
Switch to Timing tab
Click All Button
Click the Sequence tab
Set export policy
Start export
Browse for exported images
Done! Now you have a sequence of numbered images
-
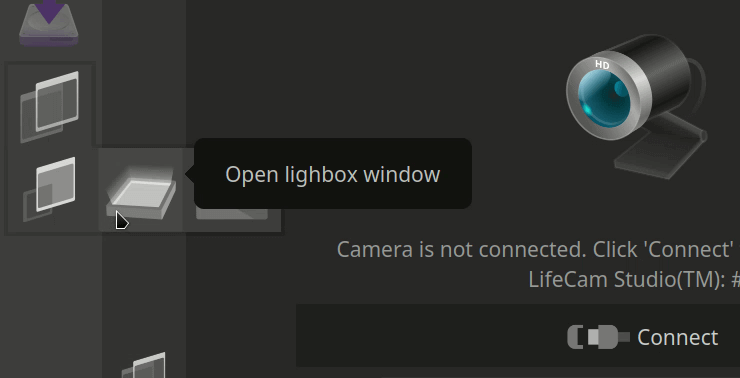 Ouvrez la fenêtre de la boîte à lumière et faites-la glisser vers la position souhaitée.
 -
 Open Settings dialog and go to the Lightbox settings.
 -
 Use color scroll to set the Lightbox color.
You can set any color for your Lightbox window
Open the Lightbox window
Open Settings dialog
Set color
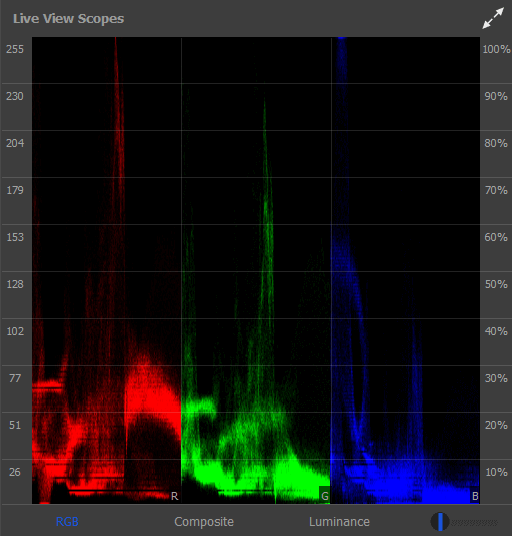
Camera Connection Troubleshooting
-
Raison possible n° 1
AnimaShooter ne peut pas traiter les données RAW en raison du manque de RAM disponible.
Variante de solution n° 1
- Fermez le programme AnimaShooter.
- Mettez l'appareil photo hors tension et déconnectez-le de l'ordinateur.
- Mettez l'appareil photo sous tension et réglez la qualité d'image sur JPEG L (Large).
- Connectez l'appareil photo à l'ordinateur.
-
Raison possible n° 1
Le type d'appareil connecté actuel est un appareil photo reflex.
Variante de solution n° 1
- Si l'appareil est connecté, appuyez sur Déconnecter.
- Changez la source en Caméras Web : cliquez sur le bouton avec l'icône de deux engrenages.
- Cliquez sur le bouton Caméras Web.
- Cliquez sur le bouton Connect.
-
Raison possible n° 1
L'ordinateur lui-même a des problèmes de connexion avec l'appareil photo.
Variante de solution n° 1
- Vérifiez si l'ordinateur lui-même peut voir la caméra. Windows affiche un message de nouveau périphérique, une fois votre appareil photo connecté. Si vous voyez ce message, cela signifie que l'ordinateur lui-même peut voir l'appareil photo.
- Vérifiez si l'utilitaire Canon EOS peut voir votre appareil photo.
- Vérifiez que votre appareil photo est pris en charge et répertorié ici.
Raison possible n° 2
Un logiciel anti-virus peut bloquer la détection de la caméra.
Variante de solution n° 2
- Si vous avez un logiciel anti-virus, assurez-vous de mettre AnimaShooter sur liste blanche afin qu'il puisse accéder à votre caméra. Ajouter une exclusion à Sécurité Windows (Antivirus Windows Defender).
Raison possible n° 3
Un autre logiciel (il peut s'agir de Dropbox) est connecté à la caméra.
Variante de solution n° 3
- Assurez-vous que Dropbox n'est pas un client de l'appareil.
- Fermez toutes les autres applications qui pourraient se connecter à votre appareil photo.
Raison possible n° 4
L'alimentation électrique de l'appareil est interrompue.
Variante de solution n° 4
- Alimentez votre appareil photo sur le secteur si possible. Si vous utilisez une batterie, assurez-vous qu'elle est entièrement chargée. Si vous utilisez le courant alternatif, retirez la batterie.
Raison possible n° 5
Connexion Wi-Fi de la caméra activée.
Variante de solution n° 5
- Désactivez le Wi-Fi de votre appareil photo.
Raison possible n° 6
Mauvaise connexion du câble USB. De nombreux problèmes de connectivité liés à la mauvaise connexion du câble USB. Les causes les plus courantes sont :
- Le câble USB est trop long.
- Le câble USB est défectueux.
- Le port USB de l'ordinateur, du hub ou de l'appareil photo est endommagé.
Variante de solution n° 6
- Utilisez des câbles USB plus courts ou utilisez un meilleur câble d'extension USB.
- Essayez d'utiliser un câble USB et un port différents.
- Utilisez une connexion directe à votre ordinateur - n'utilisez pas de hub USB pour connecter votre caméra.
-
Raison possible n° 1
En général, il s'agit simplement d'une question de réglages de l'appareil photo et/ou d'éclairage.
Variante de solution n° 1
- Augmentez la vitesse d'obturation (TV) (à au moins 1").
- Diminuez l'ouverture (AV).
- Augmentez la sensibilité ISO.
- Augmentez la quantité de lumière dans la pièce.
-
Raison possible n° 1
Le pilote de la tablette Wacom bloque d'autres programmes. Il est signalé que lorsque le pilote de la tablette Wacom est en cours d'exécution, certains programmes ne se lancent pas (AnimaShooter, Telegram, OneDrive, VLC Media Player, XnViewMP, et d'autres).
Variante de solution n° 1
- Supprimez tous les pilotes Wacom.
- Windows (10/8/7): Désactivez le service des pilotes Wacom au démarrage. Appuyez sur les touches Windows+R pour ouvrir la boîte de dialogue Exécuter, tapez services.msc, appuyez sur Entrée. Trouvez un service Wacom. Cliquez sur Service Wacom -> clic droit -> Arrêter. Maintenant essayez de démarrer AnimaShooter à nouveau.
In case you experiencing any issues with AnimaShooter
Problème: Lorsque vous appuyez sur le bouton Capture, un message d'avertissement apparaît
Problème: La connexion de la webcam n'est pas disponible lors de l'utilisation d'AnimaShooter Capture
Problème: AnimaShooter ne détecte jamais mon appareil photo
Problème: Le Live View est noir
Problème: Le programme ne démarre pas
Troubleshooting: Liveview Bigger than Captured Images
-
 AnimaShooter expects to receive images of maximum quality (L or RAW) while your camera produces images of lower size (S, S2, etc.).
 - Please, set Image Quality to L (Large).
- Turn camera OFF and disconnect it from the computer.
-
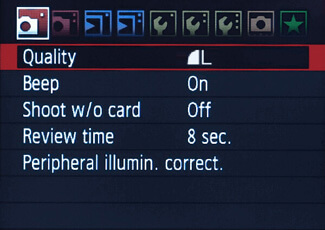 Turn camera ON and set Quality setting to L (Large).
 - Reconnect your camera to the computer and click Connect button.
- Make a shot by clicking Capture button.
Possible cause
Solution
Step 1: Turn camera OFF
Step 2: Set Quality to L
Step 3: Reconnect
Step 4: Make a shot
Keyboard Shortcuts
- Duplicate frame
- Copy frame
- Paste frame
- Select all frames
- Go to the end of Timeline
- Step one frame backward
- Save project
- Open project
- Recent projects
- Make a shot
- Go to the beginning of Timeline
- Step one frame forward
- Undo
- Redo
- Cut frame
- Switch to maximized UI layout
- Properties dialog
List of the most useful keyboard and keypad shortcuts. Num Lock must be ON
Ctrl + D
Ctrl + C
Ctrl + V
Ctrl + A
End
←
Ctrl + S
Ctrl + O
F3
Enter
Home
→
Ctrl + Z
Ctrl + Y
Ctrl + X
F6
Ctrl + P
Control via Keypad
- Make a shot
- Go to the beginning of Timeline
- Go to the end of Timeline
- Step one frame forward
- Step one frame backward
- Delete frame
- Cancel deletion (when prompted)
- Play/Pause RAM-preview or Video player (Num Lock must be ON)
Use these shortcuts with either your keyboard's right-hand number pad or separate (wired or wireless) numeric keypad
