AnimaShooter Pioneer
-
 AnimaShooter Pioneer is a user-friendly stop-motion animation software. Works with any webcam. Supported resolution is up to 3840x2400 (WQUXGA). Easy to learn, easy to use.
 -

-
 AnimaShooter has a set of stop-motion features you can use for free forever: load and save projects, shoot frames with webcam or HDMI tethering devices, edit and export your sequences, all of the filters including chromakey preview, import video, etc i.e. most of the features, even many essential stop-motion features are forever free to use
Installation
- 1. Run the installer. You will see the first Welcome screen. Click Next button.
- 2. On the License Agreement page check I accept the agreement and press Next button.
- 3. Change the destination location if you wish and press Next; button. Wait till installation succeeded.
- 4. On the final installation screen make sure the checkbox Start program after finishing installation is checked.
- 1. Select Applimage->Right click->Properties->Permissions->Allow executing file as program
- Or use command line:
$ chmod a+x AnimaShooter*.AppImage$ ./AnimaShooter*.AppImage - Double click the AppImage file to start the program.
Windows 10, 11
Linux
Activation
- Activation requires an active internet connection.
-
 Click Activate or Evaluate button. Activation dialog appears.
 -
 Enter Activation Code and click Activate button.
 -
 We recommend using copy and paste (CTRL+c and CTRL+v) to enter your license information.
 -
 Click Evaluate Now button to immediately activate the software.
 -
 Note, evaluation period cannot be prolonged. When evaluation period is over you should purchase an Activation Code to further use the product.
If you have an Activation Code
Evaluation
プログラムの利用を開始するためのアクティベーション(日本の方へ)
- アクティベーションのためにインターネット接続が必要です。ライセンスを入力するためにコピー&ペースト(貼り付け)(CTRL+c とCTRL+v)を利用したほうが便利です。
- 1.まず、貴方のメールボックスに届いたライセンスを含むメールを開いてください。2.そこからアクティベーションコードとして使用されるサブスクリプションキーをコピーしてください(CTRL+c)。
-
 3.次に、AnimaShooterのアイコンをクリックします。出てきた画面に[Activate or Evaluate]をクリックし、[Enter Your Activation Code]画面を表示します。
 -
 4.[貼り付け](CTRL+v)を使用して [Enter Your Activation Code]にお持ちのアクティベーションコード(サブスクリプションキー)を入力してください。5.次に[Activate]ボタンをクリックします。
 - 1.AnimaShooterのアイコンをクリックして、出てきた画面に[Activate or Evaluate]をクリックします。[Enter Your Activation Code] 画面が表示されます。
-
 2.[Evaluate] というタブを選択します。3.[Evaluate Now] をクリックします。プログラムを利用できます。
 -
 注:体験版ライセンスの有効期限を延長することができません。体験版ライセンスの有効期限が切れていたら、プログラムをご利用いただける期間を延長するため、アクティベーションコードを購入する必要があります。
アクティベーションコードお持ちの方:
体験版を利用する方:
De-Activation
- To move a license from one device to another, please perform deactivation. De-Activation requires an active internet connection.
-
 Click activation button. Activation dialog appears.
 - Note, you cannot deactivate your license when you are in an evaluation period.
- If you activated your license before the end of the active trial period, you will be able to use the unused time of the trial period again after deactivation.
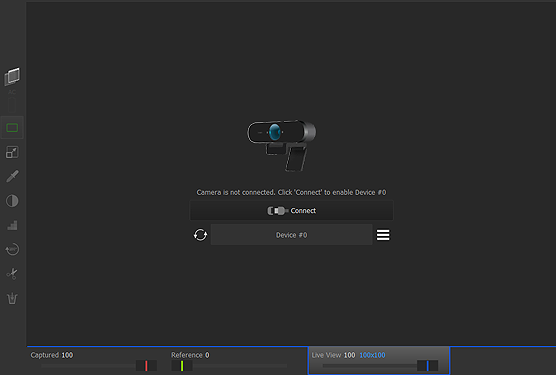
Web Camera Quick Setup
-
 Plug-in web camera to the computer with a USB cable.
 -
 Give AnimaShooter a second or two to discover it.
 -
 Once your camera name displayed press Connect button.
 -
 Create a new or open existing project.
 -
 Make a shot by clicking Capture button.
Create a Project
- To capture frames or create a video in AnimaShooter, you first create a project.
-
 To create a project click this button. In the window that appears, type a name for the project in the Name field and click Save.
 -
 You can change a project's properties at any time. To customize settings for your project, click this button.
 - You can copy or move your project to another computer to continue editing the project or to make a backup.
- AnimaShooter project consists of a project file and a project folder which name corresponds to project file name. For example, if you named your project "MyMovie", the corresponding project folder has MyMovie_files name. AnimaShooter project can contain frames, settings, temporary images, cache, etc.
- To copy your project to another computer you must copy both items: project file and a project folder. Copy the project file and a project folder as you normally do.
- To move a project to another computer or storage rather than copying it, follow the instructions for copying a project, then delete the project from the original computer.
Create a new project
Modify a project's settings
Copy a project to another device
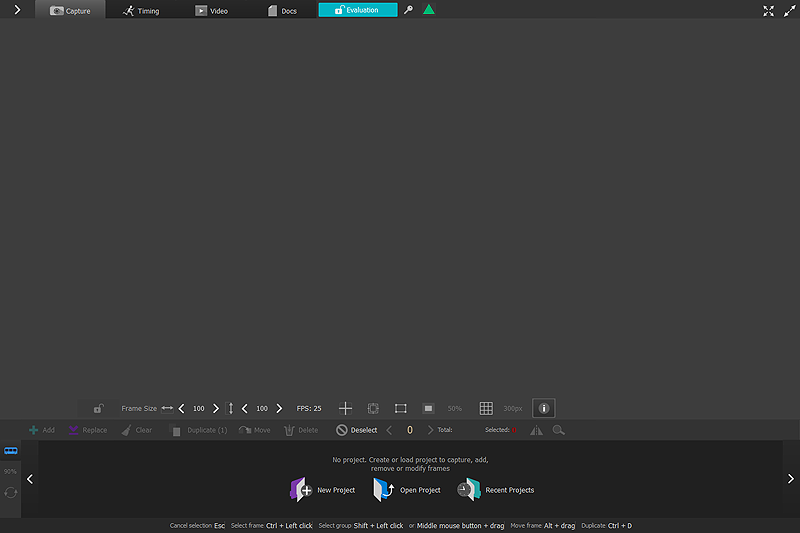
Capture
- Click Capture button to make a shot.
-
 You can capture multiple frames at once. Before the capture button locate the drop down panel. Click button with number of frames you want to capture by one press. Switch betwen Add and Replace modes to add or replace frames.
 -
 Switch to Prefix tab to set up the prefix to be prepended to each captured frame.
 -
 Use Time Lapse feature to automatically capture images at predefined intervals.
Capture multiple frames at once
Prefix
Auto Capture (Time Lapse)
Paths
- You can add to the project any number of vector lines (Paths) that can be used as guides or motion paths.
-
 The Paths panel allows you to control the paths layer, the paths themselves and their points. You can control display of paths, their color as well as the transparency of the whole Paths layer. Also, you can control points visibility, their alignment; perform undo and redo actions with points; delete one point or all of them. The Paths panel is available both from the Capture tab and from the Timing tab.
 -
 Click this button to access the Layers panel.
 -
 Click this button to hide or show the Paths layer.
 -
 Press this button to start draw paths by hand.
 -
 Click this button to add line points.
 -
 Click this button and draw a rectangle to add a polyline.
 -
 You can control the geometry of the line by dragging its points and changing their type. Place the mouse cursor over a point and use Shift + click to change point type from line to curve or vice versa.
 -
 You can move, scale, and delete individual paths, points, sets of points, or all project paths. To select a path, click it while holding down the Ctrl key, or double-click any point belonging to that path.
 -
 To delete a point or several points, select them and press the Backspace key, or Delete button.
 -
 Click this button to completely remove all paths. Confirm the deletion by clicking on this button again. You can right-click on the button or press the Esc key to cancel the deletion.
 - Note, currently, you cannot undo the deletion of paths nor points.
Adding a path
Paths control
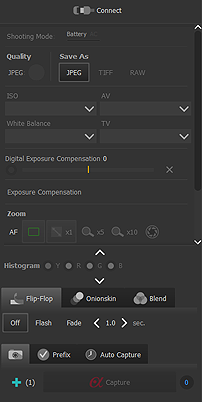
Exposure Control for RAW frames
- Applicable to RAW frames only. You need to shoot RAW frames to be able to set up exposure.
-
 You can control the exposure of your frames any time you want: during the shooting or later when you test your sequence or preparing for export.
 -
 Enable and set Preserve Highlights to preserve highlights when lighten the image (0.0 - no preservation, 1.0 - full preservation).
 -
 Enable and set Digital Exposure Compensation to set up the exposure shift. The higher this value the lighter the image.
 -
 Turn on Use camera WB to apply the camera's white balance settings during RAW processing.
 -
 Enable the Crop Image option to crop the RAW image if it's larger than it should. Many cameras that can shot RAW have a kind of feature: they can capture and save RAW images that are slightly bigger than they should be according to camera settings. Crop the unwanted with the Crop Image feature enabled.
 - Processing RAW data may be time-consuming. Please be patient.
Onionskin and Blend Modes
- You can use the Onionskin feature to mix the live image with the current captured frame.
-
 Use the layer transparency slider to decide the transparency amount of the current and previous frames. You can mix Onionskin settings, layer transparency, and Blend modes.
 -
 Set the blend mode to determine how Captured, Reference, and Live View layers are blended into each other, depending on the light condition and colors in your scene.
 - In this mode only differences between a camera and the captured image are visible. Useful when the camera or set was accidentally bumped and you need to line-up a shot.
Onionskin
Blend modes (SVG 1.2 blend modes)
Difference mode
Multiscreen
-
 AnimaShooter Pioneer can utilize multiple monitors at once, one of which can operate as a lightbox.
 -
 Click this button to open a separate window to preview captured and reference images.
 -
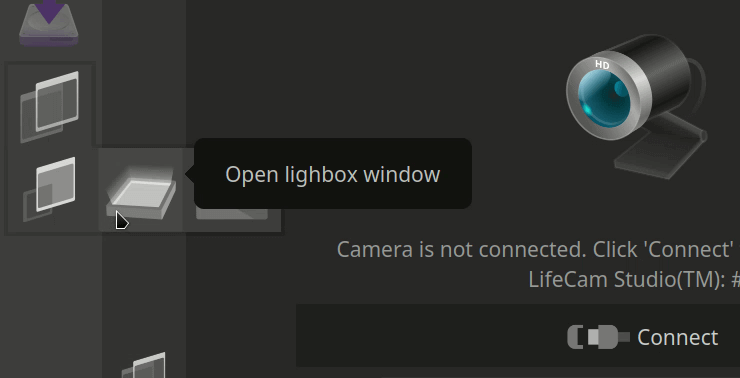
 Click this button to open a lightbox window.
Timeline
-
 You can hide any frame using the Hide button. Hidden frames are normal frames except they not played nor exported.
 -
 Use Ctrl + Click to select one or more frames.
 -
 Using the middle mouse button, you can select single frame or a group of frames.
 -
 To move one or a group of frames, use the Alt + drag.
 -
 To copy one or a group of frames, use the Ctrl + Alt + drag.
 -
 You can also use the regular Ctrl + C and Ctrl + V to copy and paste frames.
Hide any frame
Select frames in arbitrary order
Select a sequence of frames
Move frames
Copy frames
Import Images
- You can import PNG, JPG, JPEG, WEBP, CRW, CR2, JFIF, AVIF images with a few simple clicks.
-
 Click Add->Frames to add one or multiple images. Click Add->Sequence to add a sequence of numbered images. AnimaShooter will create a new frame for each image to be imported. The first new frame will be added right after the current frame.
 -
 Click Replace->Frames to replace one or multiple images. Click Replace->Sequence to replace images on your timeline with a sequence of numbered images specified by a file name mask. AnimaShooter will replace the specified amount of images starting with the current frame.
 - You can import CRW or CR2 raw image files into your project exactly the same way you import any other images.
- Note, on import AnimaShooter will convert RAW images and save every and each imported image as a JPG with 100% quality.
Add Images
Replace Images
Import RAW Images
RAM-Preview
-
 RAM-preview functionality is for rapid preview of animation in motion without creating a video file. Press Play button or Spacebar to see Ram-preview in action.
 -
 Yellow line on the bottom of Timeline marks the range of frames to be played via the RAM-preview.
 -
 To play back a project switch to Timing tab.
 - Play a whole project from the beginning: Locate the RAM-Preview control panel. Click Range -> All. Press the Space bar or click the Play button.
- Play a section of a project: Drag left and right markers to the desired positions. When you select a portion of the project, the selected area is marked with a yellow line. Press the Space bar or click the Play button.
- Stop playback: Press the Space bar or click the Stop button.
Range Tool
Play back a project
Chromakey Preview and Background
- Chromakey Preview is an effect useful with RAM-preview to promptly test your set if you use the color background for further keying.
- Chromakey or chroma keying (also known as green screen) is a visual effect and post-production technique for compositing (layering) two images together based on separating the background from the subject of a topmost image.
- You can choose any color as a chroma key background for your scene, but the only thing you need to care about is that the background color should not be present on any part of the foreground subject. Usually, the best results are achieved with a green background.
-
 Within AnimaShooter chroma key is implemented as an effect to be applied to frames. It takes a selected color range and eliminates it from the frame, revealing a background image. Go to the Filters tab to set it up.
 -
- Pick a color with Eyedropper and click Apply button.
- Set up the Similarity value for the key color. The higher this value the more similar colors will be eliminated.
- Set Blend to make pixels transparent depending on their similarity to the key color.
- Note, the chromakey effect is named "Chromakey Preview" because it is designed to quickly produce a raw effect. It is intended to be used in preview, not in production.
-
 You can add a custom background to appear behind the chroma key image. The background is a regular image of any format AnimaShooter can handle.
 -
 Click this button to choose a background image.
 - Click this button to remove a background image.
Chromakey Preview Effect for RAM-preview and Export
Set Chroma Key
Background
Export Frames
-
 AnimaShooter Pioneer can export captured frames in form of sequence of JPG, PNG, TIFF, WEBP, BMP images. You can export all of the frames or specified range of frames.
 - Range Tool is the yellow line on the bottom of Timeline, which marks the range of frames to be exported.
Range Tool
Export Video
- AnimaShooter Pioneer can create video from a sequence of captured frames. Note that frame dimensions (width and height) must be a multiple of 8. Press Encode Video button to start encoding.
- The yellow line on the bottom of the Timeline marks the range of frames to be exported.
- To play the video with an embedded player your system must have video codecs installed. If embedded video-player does not play video, most likely your system does not have the appropriate codecs.
-
 You can always check the total length of your video in hours and seconds with the time counter, located on the Timing tab. Plus, you can move the cursor over the Timeline to see the frames-to-time conversion for every part of your sequence.
Range Tool
Video Effects
-
 You can apply various effects when exporting video. Each effect is applied to the entire exported sequence of frames. Currently, you can apply only one effect at once. Video effects allow you to sharpen, smooth out the grain in your images, average your frames with lightness, adjust color, colorize frames, etc.
 - Use the Antiflicker effect to reduce flicker.
- What is flicker? It's the common problem of inconsistent lighting or luminance variation between consecutive pictures taken on the same camera, with the same lens and settings.
- Use the Spatial Smoothing effect to remove grain while preserving edges.
- Use the Sharpen effect to compensate unfocus or blurring artifacts.
Notice these effects to improve your animation:
Extract Video Frames
-
 You can import video into your project by means of turning its frames into a sequence of still images. The audio track will not be imported.
 -
 Determine where and how you want to add frames. You can add frames right after the current one, or replace frames starting from the current one. You can add frames to the Captured row as well as to the Reference row.
 -
 Click this button to open the Import dialog box. You can import any video playable by the AnimaShooter built-in video player.
 - Instead of extracting all frames, you can select a range within a video. You can adjust the range selection start and end points by clicking on Start Point and End Point buttons.
-
 If there are selected frames on the timeline, the video import will replace them, starting from the first selected frame. In this case the End button will not be available. Only as many frames as are highlighted on the timeline will be imported.
 -
 To set the start point: Make sure video is playing or paused. Drag the playhead to the desired position and click Start Point button to set a range start point.
 -
 To set the end point: Make sure video is playing or paused. Drag the playhead to the desired position and click End Point button to set a range end point.
 - To adjust where the range starts or ends: Drag the playhead to desired position and click Start Point button to set a range start point or End Point button to set a range end point.
-
 Note, extraction should take a while.
Select a range: You can select a portion of a video called a "range"
Click this button to start extraction.
Frame Size
-
 To simplify setting up a frame size, AnimaShooter provides a mechanism retaining the aspect ratio. Any change of the frame width will change its height automatically.
 - Note, the ratio is more important than size in pixels. E.g., to get a 1080p output (1920x1080, 16:9 ratio) from the 6000x4000 (or similar) frame you can set frame size that is close to 6000x4000 but still has a 16:9 ratio. This could be 6000x3375 pix. Set your frame size to 6000x3375, shoot frames, then on export set Video Export Policy to crop frame to 6000x3375 and scale down to 1920x1080.
Exposure Sheet
-
 An Exposure Sheet (also known as X-sheet or Dope Sheet) is a traditional animation tool that allows an animator to organize and control the timing of the animation. The timing tab contains the Exposure Sheet table which shows the sequence of captured frames and their phase numbers. Table cells may have rectangular markers inside. The blue marker indicates a first static frame within a sequence of static frames. The black marker indicates one of the normal (nonstatic) frames. You can specify a phase number directly inside the Exposure sheet table cell. To add a phase number, click on one of the nonstatic or first static frames and type a number where the zero appears.
Uninstallation
- If you are using AnimaShooter as an AppImage, simply delete the .AppImage file.
- On the Start menu, select Settings .
- Select System -> Apps & features. Select the program, and then select Uninstall.
- Follow the directions on the screen.
Linux
Windows 10, 11
AnimaShooter Workflow Overview
- To capture frames or create a video in AnimaShooter, you first create a project. To create a project click this button In the window that appears, type a name for the project in the Name field and click Save. You can change a project's properties at any time. To customize settings for your project, click this button
 You can copy or move your project to another computer to continue editing the project or to make a backup.
 - Plug-in your camera to computer with USB cable. If you're using AnimaShooter Сapture: switch your camera to Manual (M) mode. Set camera quality setting to L, RAW, RAW+L. Turn camera ON and give AnimaShooter a second or two to discover it. Once your camera name displayed, press Connect button.
- Click Capture button to make a shot. Wait until the shooting process completes. You can capture multiple frames at once. Before the capture button locate the drop down panel. Click button with number of frames you want to capture by one press.
- Switch to Timing tab to check your animation with RAM-preview feature. Look at the Timeline. Yellow line at the bottom of Timeline marks the range of frames to be played. Set a range of frames to play and press Play button or spacebar to see RAM-preview in action.
- When your project is finished, you can encode a video of various formats. You can export your video files for publishing, sharing, broadcast delivery, further audio mixing, or post-production. To further polish your project, you can apply some filters to your sequence or video: adjust contrast and/or saturation, remove noise.
- The most common method of exchanging video across editing and compositing programs is a sequence of numbered images. AnimaShooter can export captured frames in the form of a sequence of JPG, PNG, TIFF, WEBP, BMP images. You can import your image sequence into an editing program of your choice (AfterEffects, Premiere Pro, etc.).
The overall process for creating a movie is described below. You don’t have to do every step, and you might do others that aren’t listed. The real workflow isn’t necessarily linear
Create a new project
Connect your camera
Capture frames
Test your sequence
Create a video
Create a sequence
Enable Live View Scopes Window
-
 Click this button to evoke Live View Scopes window.
 -
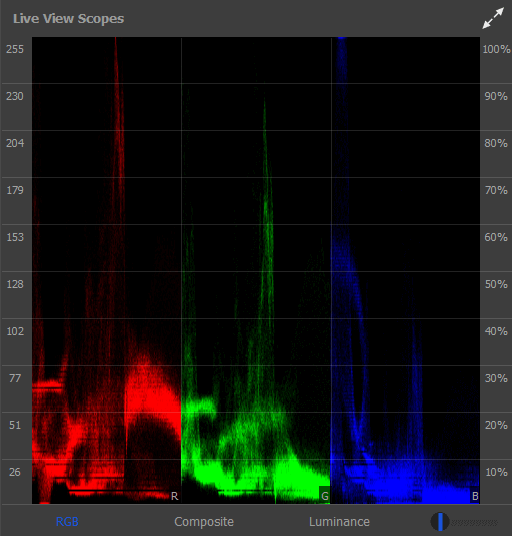 The The Waveform shows the intensity of both the luminance (brightness) and chrominance (color) levels of an image, depending on the waveform you choose. Unlike the histogram, the waveform displays the levels of each pixel in its location on the image.
 -
 You can easily choose which type of waveform you’d like to see: the RGB waveform (shows the RGB signals separated); the luma waveform (displays the brightness of shots) and the chrominance (shows you all three red, green, and blue channel levels as a composite). The display brightness level in the oscilloscope can be adjusted.
 -
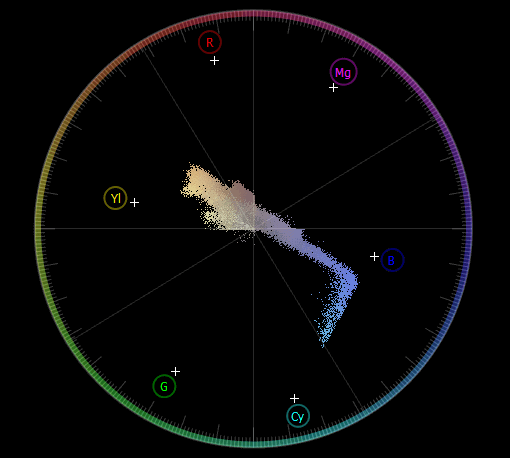 The vectorscope displays the hue and the amount of color in an image.
AnimaShooter is able to show Y Waveform, RGB Parade, and Vectorscope in real-time
Evoke Live View Scopes window
Waveform
Types of waveform and brightness level setting
Vectorscope
Import Frames
-
 Every frame has two cells: Captured image cell (1) and Reference image cell (2). Use Add and Replace buttons to control the contents of cells.
 - Use Add option to add new captured or reference frames. Use Replace option to fill an empty cell with an image (captured or reference). Use Add->Sequence or Replace->Sequence option to import sequence of numbered images.
-
 Click Create a new project or Recent projects to load an existing project.
 - Click Add button. To find it, look at the lower left corner of AnimaShooter window.
-
 You can select any amount of image files in arbitrary order. Click Open to start import.
 - Click Add button. To find it, look at the lower left corner of AnimaShooter window.
-
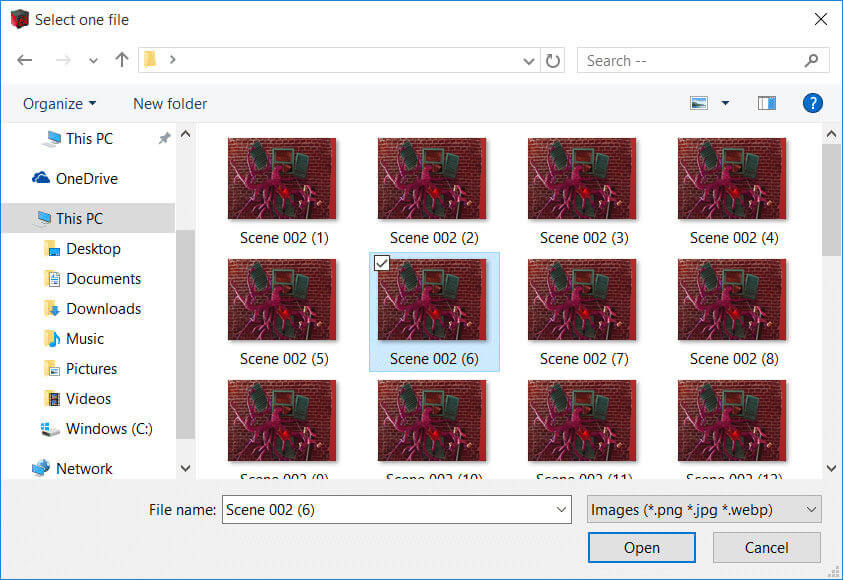 Select one file and click Open. AnimaShooter will import a sequence of numbered images, using selected file name as a mask. For example, if you choose Scene_002 (6).png file, the following files will be imported:
- Scene_002 (1).png
- Scene_002 (2).png
- Scene_002 (3).png
- ...
- Scene_002 (2930).png
Import arbitrary frames or a sequence of frames, using single file name as a mask
Structure of the frame
1. Create a new or open an existing project
A. Import a specified amount of frames
A1. Click Add button
A3. Select frames
B. Import a sequence of numbered images, using single file name as a mask
B1. Click Add button
B3. Select one frame
High Resolution Video Export
-
 Click Open project file or Recent projects and load an existing project.
 - Switch to Timing tab and look at the bottom of the Timeline. The yellow line on the bottom of the Timeline marks the range of frames to be exported.
-
 Specify video size. You can set frame size up to 8k (7640 x 4320 pixels). Note that frame dimensions (width and height) must be a multiple of 8.
 -
 Wait until the process completes.
 - Exporting high-res frames that are 4000 x 3000 or larger requires a lot of RAM. You can set frame size up to 8k (7640 x 4320 pixels) and successfully produce a video (WebM or OGV), but that file may not be playable on some computers and with some players.
- AnimaShooter is primarily for capturing stop motion animation. Though AnimaShooter is not video editing software it is quite suitable for stitching together frames. You can always use AnimaShooter to convert your frames into a video.
Make a video: WebM, OGV, AVI or uncompressed video
Open project
Switch to Timing tab
Set up video size and options
Wait
Copy a Sequence
- Open an existing project.
- Use Ctrl + Click or middle mouse button to select a range of frames to be copied.
- Hold Ctrl + Alt, press the left mouse button, and drag the orange arrow from the first frame to the last one.
How to copy a sequence of frames
Load Your Project
Select Frames to Copy
Copy Frames
Sequence Export
- Click Open project file or Recent projects and load an existing project.
- Switch to Timing tab and look at the bottom of the Timeline. The yellow line on the bottom of the Timeline marks the range of frames to be exported.
-
 Click this button if you wish to export all of the frames. You can always adjust the range manually.
 - Click Sequence tab to set up image format and export options. Choose an export format (PNG, JPG, TIFF, WebP, BMP).
- If the current frame size doesn't match the actual size of the captured image, you need to set up the export policy. AnimaShooter can stretch the image to fit the frame size or crop image.
- Click this icon to select the output folder. Then click Start Export button to begin export. Wait until the export process completes.
-
 Click View Exported Frames button.
 -
 The most common method of exchanging video across editing and compositing programs is a sequence of numbered images. You can import your image sequence to an editing program of your choice (AfterEffects, Premiere Pro, etc.).
Export your frames as a sequence of JPG, PNG, TIFF or WEBP images
Open project
Switch to Timing tab
Click All Button
Click the Sequence tab
Set export policy
Start export
Browse for exported images
Done! Now you have a sequence of numbered images
Set the Lightbox Color
-
 Open the Lightbox window and drag it to the desired position.
 -
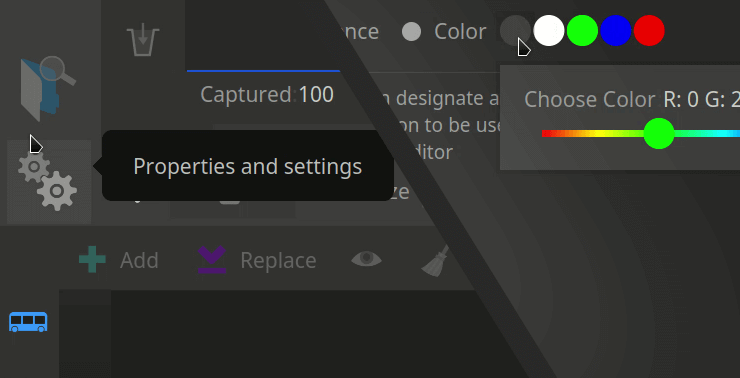 Open Settings dialog and go to the Lightbox settings.
 -
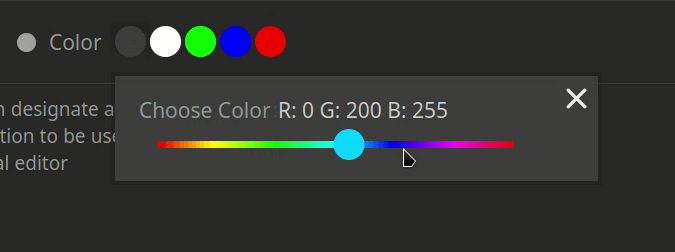 Use color scroll to set the Lightbox color.
You can set any color for your Lightbox window
Open the Lightbox window
Open Settings dialog
Set color
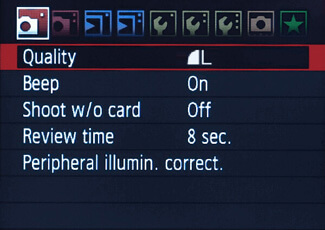
Camera Connection Troubleshooting
-
Possible cause #1
AnimaShooter is unable to process RAW data due to a lack of memory available (RAM).
Solution #1
- Close AnimaShooter.
- Turn camera OFF and disconnect it from the computer.
- Turn camera ON and set Image Quality to JPEG L (Large).
- Reconnect camera and restart AnimaShooter.
-
Possible cause #1
The current capturing source is DSLR.
Solution #1
- If connection is enabled, click Disonnect.
- Change source to Web Cameras: click button with two gears icon.
- Click Web Cameras button.
- Click Connect button.
-
Possible cause #1
The computer itself has problems connecting to the camera.
Solution #1
- Verify if the computer itself can see the camera. Windows pops up a new device message, once your camera is connected. If you see the message, it means that the computer itself can see the camera.
- Check if Canon EOS Utility can see your camera.
- Make sure your camera is supported and listed here.
Possible cause #2
Anti-virus software may block camera detection.
Solution #2
- If you have anti-virus software, make sure to white-list AnimaShooter so that it can access your camera. Add an exclusion to Windows Security (Windows Defender Antivirus).
Possible cause #3
Another software is connected to the camera (Dropbox may be a client of the camera).
Solution #3
- Make sure Dropbox is not a client of the camera.
- Close any other applications that might connect to your camera.
Possible cause #4
The power supply to the camera is interrupted.
Solution #4
- Power your camera with AC power if possible. If you do use a battery, make sure it is fully charged. If you use AC power, remove the battery.
Possible cause #5
Camera Wi-Fi connection enabled.
Solution #5
- Deactivate your camera's Wi-Fi.
Possible cause #6
Poor USB cable connection. Many connectivity issues related to the poor USB cable connection. The most common causes are:
- The USB cable is too long.
- The USB cable is defective.
- The USB port on the computer, hub or camera is damaged.
Solution #6
- Use shorter USB cables or use a better USB extension cable.
- Try using a different USB cable and port.
- Use direct connection to your computer — do not use USB-hub to connect your camera.
-
Possible cause #1
Usually, this is just a matter of camera settings and/or lighting.
Solution #1
- Increase the shutter speed (TV) (to at least 1").
- Decrease the aperture (AV).
- Increase the ISO.
- Increase the amount of light in the room.
-
Possible cause #1
Wacom Tablet driver blocking other programs. It is reported that when the Wacom Tablet driver is running, some programs won't launch (AnimaShooter, Telegram, OneDrive, VLC Media Player, XnViewMP, and others).
Solution #1
- Delete all Wacom drivers.
- Windows (10/8/7): Disable Wacom drivers service at startup. Press the Windows+R keys to open the Run dialog, type services.msc, press Enter. Find a Wacom service. Click on Wacom service -> right click -> Stop. Now try to start AnimaShooter again.
In case you experiencing any issues with AnimaShooter
Issue: On pressing Capture button, warning message appears
Issue: The web camera connection is unavailable when using AnimaShooter Capture
Issue: AnimaShooter never detects my camera
Issue: The Live View is black
Issue: The program does not start
Troubleshooting: Liveview Bigger than Captured Images
-
 AnimaShooter expects to receive images of maximum quality (L or RAW) while your camera produces images of lower size (S, S2, etc.).
 - Please, set Image Quality to L (Large).
- Turn camera OFF and disconnect it from the computer.
-
 Turn camera ON and set Quality setting to L (Large).
 - Reconnect your camera to the computer and click Connect button.
- Make a shot by clicking Capture button.
Possible cause
Solution
Step 1: Turn camera OFF
Step 2: Set Quality to L
Step 3: Reconnect
Step 4: Make a shot
Keyboard Shortcuts
- Duplicate frame
- Copy frame
- Paste frame
- Select all frames
- Go to the end of Timeline
- Step one frame backward
- Save project
- Open project
- Recent projects
- Make a shot
- Go to the beginning of Timeline
- Step one frame forward
- Undo
- Redo
- Cut frame
- Switch to maximized UI layout
- Properties dialog
List of the most useful keyboard and keypad shortcuts. Num Lock must be ON
Ctrl + D
Ctrl + C
Ctrl + V
Ctrl + A
End
←
Ctrl + S
Ctrl + O
F3
Enter
Home
→
Ctrl + Z
Ctrl + Y
Ctrl + X
F6
Ctrl + P
Control via Keypad
- Make a shot
- Go to the beginning of Timeline
- Go to the end of Timeline
- Step one frame forward
- Step one frame backward
- Delete frame
- Cancel deletion (when prompted)
- Play/Pause RAM-preview or Video player (Num Lock must be ON)
Use these shortcuts with either your keyboard's right-hand number pad or separate (wired or wireless) numeric keypad
